


The Modern Man’s Guide to Tying a Tie
There comes a time in every man’s life when he must put aside the clip-on ties and step up to the plate with the real thing. This is no problem if you know how to tie one. Otherwise, read on.
As with any basic skill, practice makes perfect. Once a simple knot is well in hand, so to speak, you can try out other knots and even match different ones with shirt collars of varied sizes.
Start with the classic four-in-hand knot, so called (supposedly) because English huntsmen toward the end of the 19th century could tie the knot with one hand while simultaneously holding onto the reins of four horses. We recommend skipping the horses part and using two hands. If a sip of bourbon helps before you start, we don’t object. But let’s take it step-by-step:
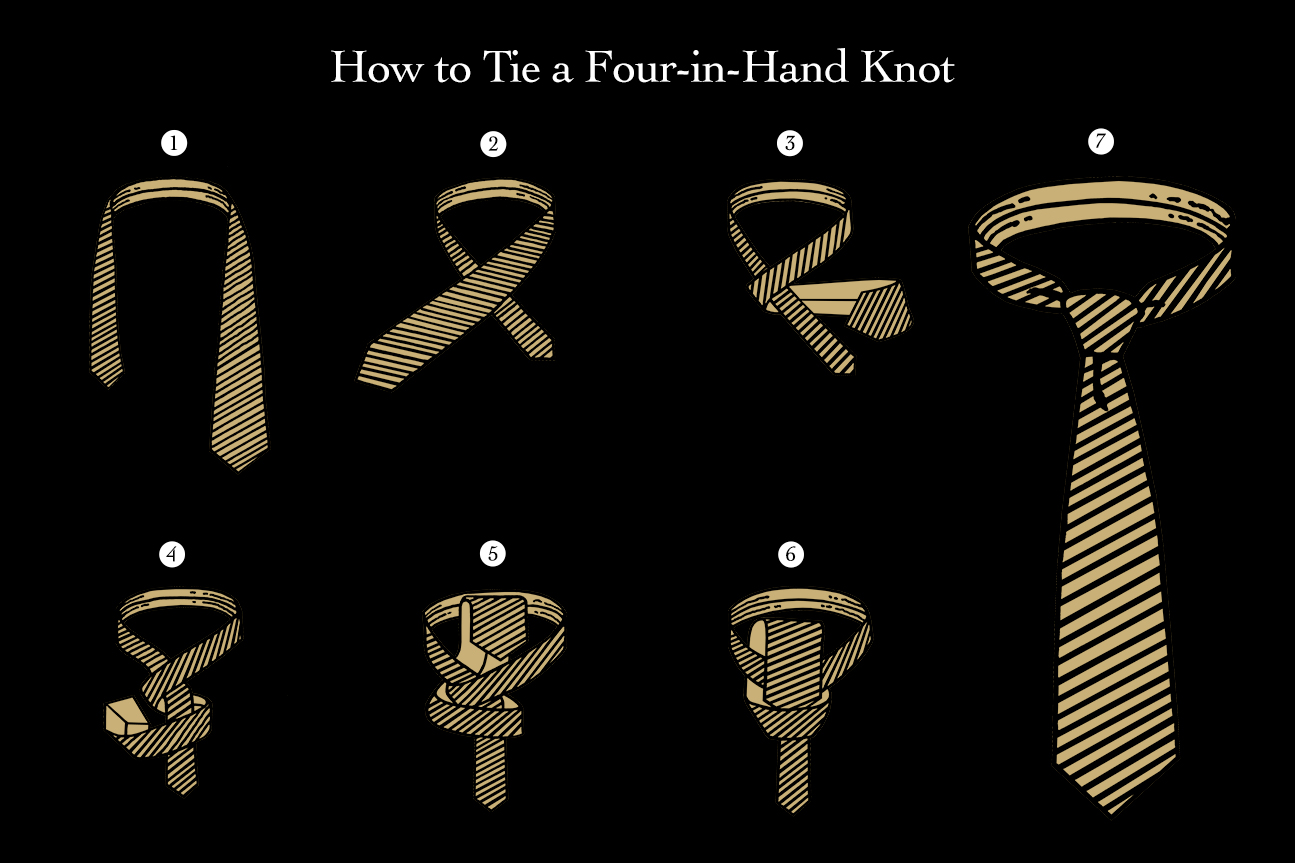
- With your shirt collar up and top button buttoned, drape the tie around your neck, wide side to the right, narrow to the left. (Left-handers could do all this in reverse if it seems easier.) The narrow side should probably extend to about six inches above your belt, although that will vary depending on the length of the tie.
- Cross the wide side over the front of the narrow, holding onto the meeting point with your left thumb and forefinger.
- Cross the wide side under and over the front of the narrow side again. You’ve started to create your knot.
- Now take the wide end back and up through the loop you’ve created near your chin.
- Still holding onto the knot you’ve started to create with your left hand, take the tip of the tie with your right thumb and forefingers and thread it down behind and through the front part of the loop.
- You’ve done it. Now just hold onto the narrow end and pull the wide part down to start tightening the knot.
- Still holding onto the narrow end, slide the knot up to your neck. Pull down your collar, adjust and smooth things out as necessary, and head out for that date. Or, if your tie came out too short or too long (it should be at just about belt level), start over. If you still have some of that bourbon left over, now would be a good time to take another sip.
You can wear this basic knot anywhere, anytime, though it is recommended for more narrow shirt collars. Also, it tends to be asymmetrical, so you may want to start experimenting with more advanced knots.
To our minds, the half-Windsor is a classier looking knot than the four-in-hand, and it’s worth the practice to get it right. The half-Windsor is a more symmetrical triangle of a knot, and although it’s slightly bulkier, it’s still fine with all standard shirt collars.
It’s also pretty easy to tie. The slight variation is that rather than a second crossing of wide end over narrow as in step 3 above, you put the wide end up and through the neck loop (front to back). Then you make another crossing over the forming knot, and come up from behind and through as in steps 4 and 5. Done.
The Windsor knot (or full Windsor) is for graduate study after the other two knots are mastered. It’s also symmetrical, but it’s larger than either of the other two and best used for widespread collars.
Think you’d prefer to learn how to tie a bow tie? That’s a story for another day.